

Why your traffic graphs look like a ski slope - and why that’s not the real problem
Warm-up first.
For more than a decade, B2B content marketing ran on a comfortable bargain. You publish helpful beginner content. Search engines send curious strangers. A small percentage turn into leads. Everyone nods, updates a spreadsheet, and repeats the ritual next quarter.
The Comfortable Bargain Ended
A decade-old system quietly voided
The system moved on
Zero-click answers replaced the ritual
That bargain is now quietly void.
Zero-click results swallow intent before it reaches your site. AI summaries answer questions without ever introducing themselves. Buyers skim, compare, and decide without touching your lovingly optimised “What is X?” post. And marketers are staring at analytics dashboards wondering whether the internet has personally wronged them.
It hasn’t. The system just moved on.
This piece is about what actually collapsed, why “top-of-funnel” is now a misleading mental model, and what replaces it if you want relevance instead of nostalgia.
What stopped vs what continues
Separate vanished tactics from durable value
Old top-of-funnel contract
Real marketing outcomes
Traffic alone is no longer proof of influence
What actually died (and what didn’t)
Let’s be precise before we get dramatic.
People did not stop searching.
People did not stop learning.
People did not stop buying.
What stopped working is a very specific contract: generic educational content as a traffic acquisition layer.
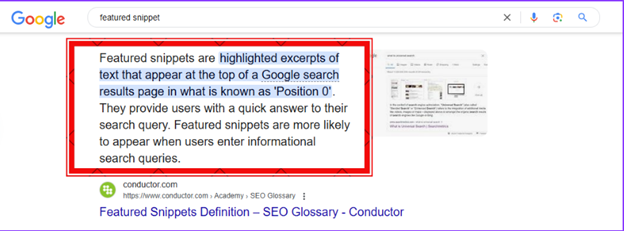
Search engines used to reward you for explaining basics because they needed pages to send users to. Now they reward you by stealing your explanation, summarising it, and keeping the user right where they are.
Featured snippets were the warning shot. AI overviews finished the job.
If your content exists mainly to answer questions like:
- “What is customer segmentation?”
- “Benefits of workflow automation”
- “How does CRM software work?”
Then congratulations. You trained the machine that now replaces you.
The brutal truth is this: top-of-funnel content didn’t fail. It succeeded too well. It became predictable, compressible, and therefore extractable.
What didn’t die is demand creation, education, or authority. What died is the assumption that traffic is the only proof those things exist.
No Neat Descent
Modern buying is parallel and invisible
AI Summary
Today
LinkedIn Post
Week later
ChatGPT Query
Another week
Brand Search
3 months later
Invisible Influence
If your strategy only values what you can count, you'll invest in the wrong things
Why zero-click broke the funnel metaphor

The funnel metaphor always had issues, but zero-click made them impossible to ignore.
Funnels assume:
- Entry happens at the top.
- Movement is sequential.
- Attention is something you “capture” and then “move”.
Modern buying doesn’t behave like that.
A prospect might:
- Read an AI summary today
- See a LinkedIn post next week
- Ask ChatGPT for vendor comparisons
- Finally Google your brand name directly three months later
No neat descent. No tidy attribution path. No polite form fill.
Top-of-funnel content was built for a world where discovery was linear and slow. AI-driven discovery is neither. It is fast, parallel, and increasingly invisible.
So when marketers say “our TOFU isn’t working”, what they usually mean is:
we can’t see the early influence anymore.
And if your strategy only values what you can count, you will naturally over-invest in the wrong things.
Reference Gravity
Content exists to be recalled, not clicked
From educating beginners to arming decision-makers
The real replacement is not “better content”
This is where most advice goes off a cliff.
You’ll hear:
- “Write more original thought leadership”
- “Be more authentic”
- “Create higher quality content”
All true. All useless without a sharper frame.
What replaces top-of-funnel content is not better explanations.
It is reference gravity.
Reference gravity means your content exists to be:
- Quoted
- Remembered
- Recalled
- Compared against
Not clicked.
AI systems do not reward vibes. They reward clarity, structure, and consensus. Human buyers don’t remember your 2,000-word beginner guide. They remember the model, distinction, or example that helped them think.
The job has shifted from educating beginners to arming decision-makers.
That’s a very different brief.
What Earns Attention Now
Beyond generic TOFU content
Comparative Content with Constraints
Trade-offs under specific conditions resist summarization
Decision Frameworks
Show judgment, not just instructions
Post-Mortems
Document why things break, not just success stories
Anchored Positions
Clear stances backed by evidence create mental shortcuts
Four content types that actually work now
If generic TOFU is dead, what earns attention in its place?
Across B2B SaaS, services, and consulting, four patterns consistently outperform explanation content.
1. Comparative content with constraints
AI can summarise definitions. It struggles with trade-offs.
Content that compares options under specific conditions sticks because it mirrors real decisions.
Not:
“Tool A vs Tool B”
But:
“Tool A vs Tool B when your sales team is under 20 people and deals are sub-$10k”
This kind of specificity resists summarisation without losing meaning.
2. Decision frameworks, not how-tos
“How to do X” is a tutorial.
“When X is the wrong move” is a framework.
Frameworks travel better than instructions. They show judgment, not just knowledge. AI may paraphrase them, but it still needs to attribute the thinking somewhere.
3. Post-mortems and failure analysis
Everyone publishes success stories. Almost nobody documents why things break.
Failure analysis introduces nuance, caveats, and sequence. Those are exactly the things generic summaries flatten.
If your content explains why something failed, not just how to succeed, it earns trust from experienced buyers.

4. Strong points of view tied to evidence
Not hot takes. Anchored positions.
When your content clearly says “this approach stops working after stage X” and backs it with examples, you create a mental shortcut for readers. They may forget the article, but they remember the stance.
That’s influence without traffic.

What this means for your metrics
Here’s the uncomfortable bit.
If you judge success by:
- Pageviews
- First-touch attribution
- Form fills per article
Then the replacement strategy will look worse before it looks better.
The Uncomfortable Bit
Shallow metrics vs signals that matter
Old Signals
- Pageviews
- First-touch attribution
- Form fills per article
- Time on page
New Signals
- Brand search volume
- Prospect recall in sales calls
- Verbal content references
- AI answer mentions
But watch different signals:
- Brand search volume
- Sales calls where prospects “already know your thinking”
- Deals where your content is referenced verbally, not clicked
- AI answers that mention your framing, even without a link
Top-of-funnel content was easy to measure because it was shallow.
What replaces it is harder to measure because it actually matters.
Three Properties of AI-Optimized Content
Without
Distortion
How to design content for AI recall (not human skimming)
The first shift you need to make is psychological:
your primary reader is no longer a beginner human. It’s a synthesiser.
AI systems don’t read like people. They extract. They compress. They weigh consensus and structure. They privilege content that looks like it knows where its edges are.
That means content written for AI recall has three properties.
First, it has clear conceptual boundaries. Definitions with scope. Frameworks with limits. Claims with conditions. Content that says “this applies when X, breaks when Y” is easier to reuse than content that tries to sound universally helpful.
Second, it has stable internal structure. Headings that describe ideas, not vibes. Paragraphs that each do one job. Lists used sparingly but decisively. This isn’t about SEO formatting. It’s about making ideas extractable without distortion.
Third, it demonstrates judgment density. AI does not trust content that only explains. It trusts content that evaluates. When you show trade-offs, sequence, and failure modes, you signal that there’s a thinking entity behind the words.
This is why most blog content performs poorly in AI summaries. It is written to be pleasant, not precise.
Answers Resolve. Positions Shape.
Answer
Resolves a question completely
- Assumes ignorance
- Aims for completeness
- Lists options neutrally
- Disappears into averages
Position
Shapes how questions are asked
- Assumes partial knowledge
- Aims for orientation
- Draws lines between choices
- Surfaces in summaries
Stop publishing answers. Start publishing positions.
There’s a quiet but important difference between an answer and a position.
An answer resolves a question.
A position shapes how future questions are asked.
Top-of-funnel content was answer-heavy. It assumed ignorance and aimed for completeness. What replaces it assumes partial knowledge and aims for orientation.
A strong position:
- Names a problem others gloss over
- Draws a line between acceptable and risky choices
- Makes a prediction, even a modest one
Weak content says: “Here are five ways to do X.”
Strong content says: “Most teams try X first. That’s why they stall.”
When AI systems summarise markets, they don’t just list facts. They surface dominant interpretations. If your content never commits to one, it disappears into the statistical average.
This is uncomfortable for marketers trained to avoid offence. But neutrality is not clarity. It is invisibility.
Modular Pages Survive Summarization
Introductions state claims early
Lead with the thesis. AI trims narrative ramps first.
Sections answer one question
Each block stands alone without collapsing the argument.
Conclusions restate implications
Skip pleasantries. Reinforce what matters for decisions.
Designing pages that survive summarisation
Let’s get practical.
A page that survives summarisation is modular. Each section can stand alone without collapsing the argument.
That means:
- Introductions that state the claim early
- Sections that answer one question decisively
- Conclusions that restate implications, not pleasantries
Avoid long narrative ramps. AI trims those first.
Instead of:
“We’ll explore why this matters, how it evolved, and what it means for teams today…”
Lead with:
“This approach fails once teams cross X threshold. Here’s why.”
You’re not dumbing content down. You’re sharpening it.
Ironically, this also helps humans. Busy buyers don’t want suspense. They want orientation. They want to know if the piece is worth trusting before they commit ten minutes.
Search Is No Longer Discovery
It's a compression engine. Distribution replaces discovery.
Distribution replaces discovery
Here’s the part nobody wants to hear.
If you are still relying on search as your primary discovery channel, you’re already late.
Search is no longer a distribution engine. It’s a compression engine.
What replaces discovery is intentional distribution:
- Email lists where readers already trust you
- LinkedIn posts that carry ideas, not links
- Sales teams using content as conversation scaffolding
- Communities where ideas circulate without attribution
This is why “dark social” is exploding. Influence travels faster than clicks.
Your content strategy should assume:
- Fewer anonymous readers
- More repeat exposure
- More indirect impact
Which means writing content that works out of context. A single paragraph quoted in Slack should still make sense. A screenshot on LinkedIn should still carry a point.
If your content only works when read top to bottom, it’s fragile.
Attribution Shifts from Clicks to Cues
Signals
Rethinking attribution without losing your mind

The hardest adjustment is measurement.
Top-of-funnel content gave marketers something comforting: dashboards. Numbers went up. Reports looked tidy.
The replacement world is messier.
Attribution shifts from clicks to cues:
- Prospects referencing your ideas unprompted
- Sales cycles shortening without obvious reason
- Brand terms rising while generic keywords fall
- Content being shared internally, not externally
This requires organisational maturity. You have to trust signals that don’t fit neat models.
It also requires confidence. If your content has no real thinking, it won’t show up anywhere - visible or invisible.
Audit Every Piece in Your Library
What to do with your existing content library

You don’t need to burn your archive. But you do need to be ruthless.
Ask of every piece:
- Does this help someone decide something?
- Does it contain a position, or just information?
- Would an AI summary lose its value?
If the answer is no, you have three options:
- Consolidate it into a stronger reference piece
- Rewrite it around a specific decision
- Let it quietly die
Most teams choose option four: keep publishing more. That’s how content libraries turn into landfills.
Less content. More gravity.
Content Marketing's New Job
Perspective
The new job of content marketing

Content marketing is no longer about pulling strangers into funnels.
It’s about:
- Teaching the market how to think about your category
- Giving buyers language for their internal debates
- Making your perspective unavoidable once discovered
Traffic was a proxy for relevance. It’s a weak one now.
Relevance shows up in repetition. In recall. In reference.
And that’s harder work. But it’s work that compounds.
Wrap-up or TL;DR
Top-of-funnel content didn’t collapse because people stopped caring. It collapsed because it became too easy to compress.
AI summaries didn’t kill content marketing. They exposed which content was never doing real work.
What replaces it is not louder publishing or clever optimisation. It’s content that takes a stand, draws boundaries, and helps people decide.
If your content can be summarised without losing meaning, it probably didn’t have much to begin with.
Want to get ahead? Stop asking how to get more clicks. Start asking what you want the market to remember about you - and write relentlessly toward that.